How to show a different banner to each country on Shopify
Two ways to give Shopify visitors from each country their own banner: free theme code, or a rule you change without code and can measure.
Shopify gives you two ways to show visitors from different countries different banners. You can add a few lines of Liquid to your theme, which is free but means editing code for every change. Or you can use a tool that checks each visitor's country and shows the banner from a rule, which you change without touching the theme and can measure afterwards. This guide walks through both.
What you'll build
A banner across the top of your store that only visitors from one country see. In the examples, visitors from Canada read Free shipping across Canada, and everyone else sees your store as it is today.
The same steps work for any message: delivery times, a local promotion, a note about duties, or a link to the version of your store made for that country.
Option 1: Liquid in your theme (free)
Shopify themes can read localization.country: the country your storefront has selected for the visitor, as Shopify's Liquid reference describes it. That country comes from your Shopify Markets settings and from the visitor's own choice in your country selector.
-
In Shopify admin, open Online Store → Themes.
-
Duplicate your live theme first, so you have a copy to go back to. Then choose ⋯ → Edit code on the live theme.
-
Open layout/theme.liquid and add this straight after the opening <body> tag:
{% if localization.country.iso_code == 'CA' %}
  <div class="country-banner">Free shipping across Canada</div>
{% endif %}
-
Style .country-banner in your theme's stylesheet, and choose Save.
Before you rely on it, know its limits:
- It reads the storefront's country, not a location lookup. What it returns depends on how your Markets are set up and on what the visitor picked. Check it from each country you care about, through a VPN, before you trust it.
- Every change is a code change. New wording, another country or the end of a promotion all mean editing the theme again.
- It can't tell you whether the banner helped. Nothing compares visitors who saw it with visitors who didn't.
Option 2: a GeoEngage rule (no code after setup)
GeoEngage looks up each visitor's country from their IP address and shows the banner from a rule. You add one tag to your theme once; after that, every change happens in the rule builder.
Step 1: Add the tag to your theme
Follow Install GeoEngage on Shopify. The tag goes in layout/theme.liquid, on the line straight after <head>, and you only do it once.
Step 2: Choose who sees the banner
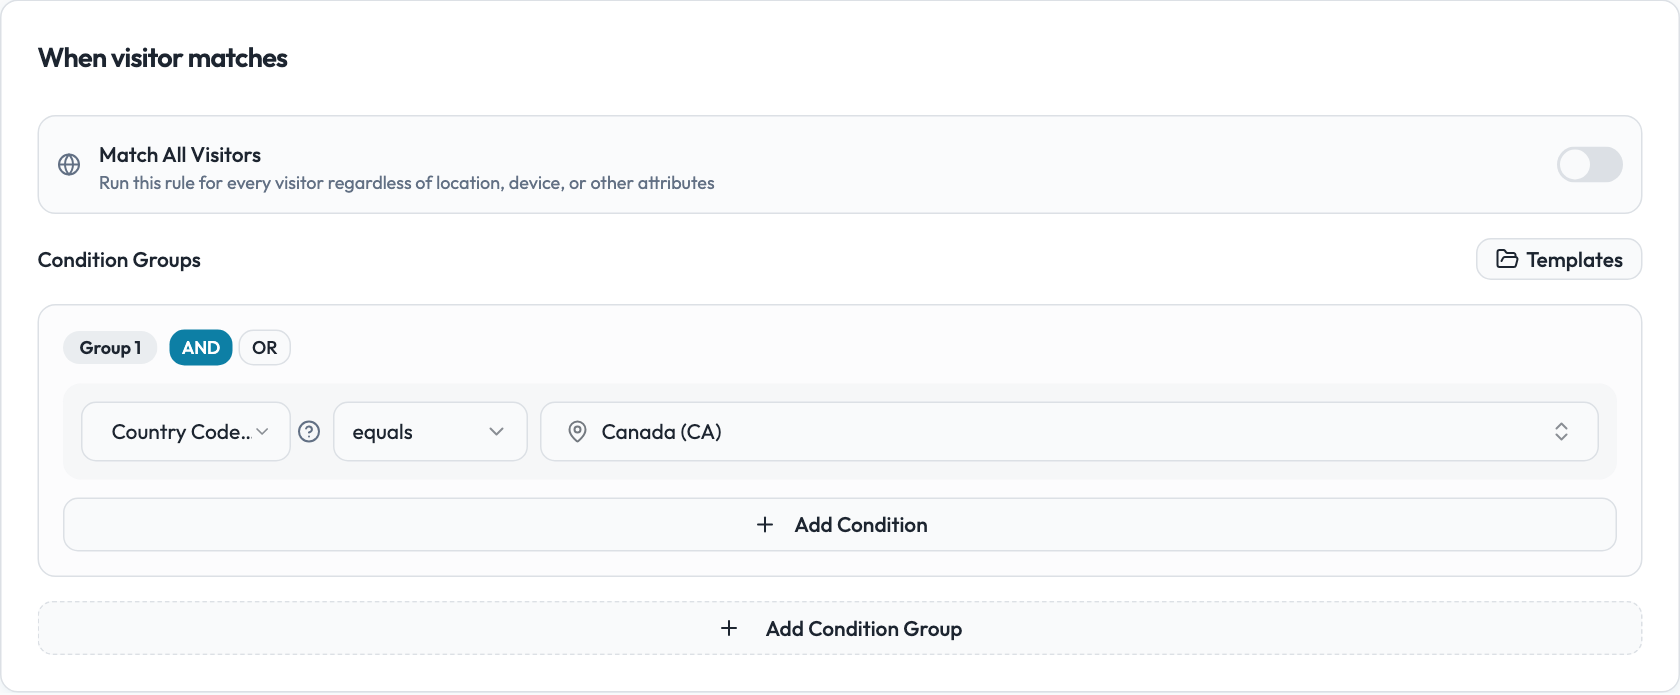
Create a rule. Under When visitor matches, add the condition Country Code equals Canada (CA).
Step 3: Write the banner
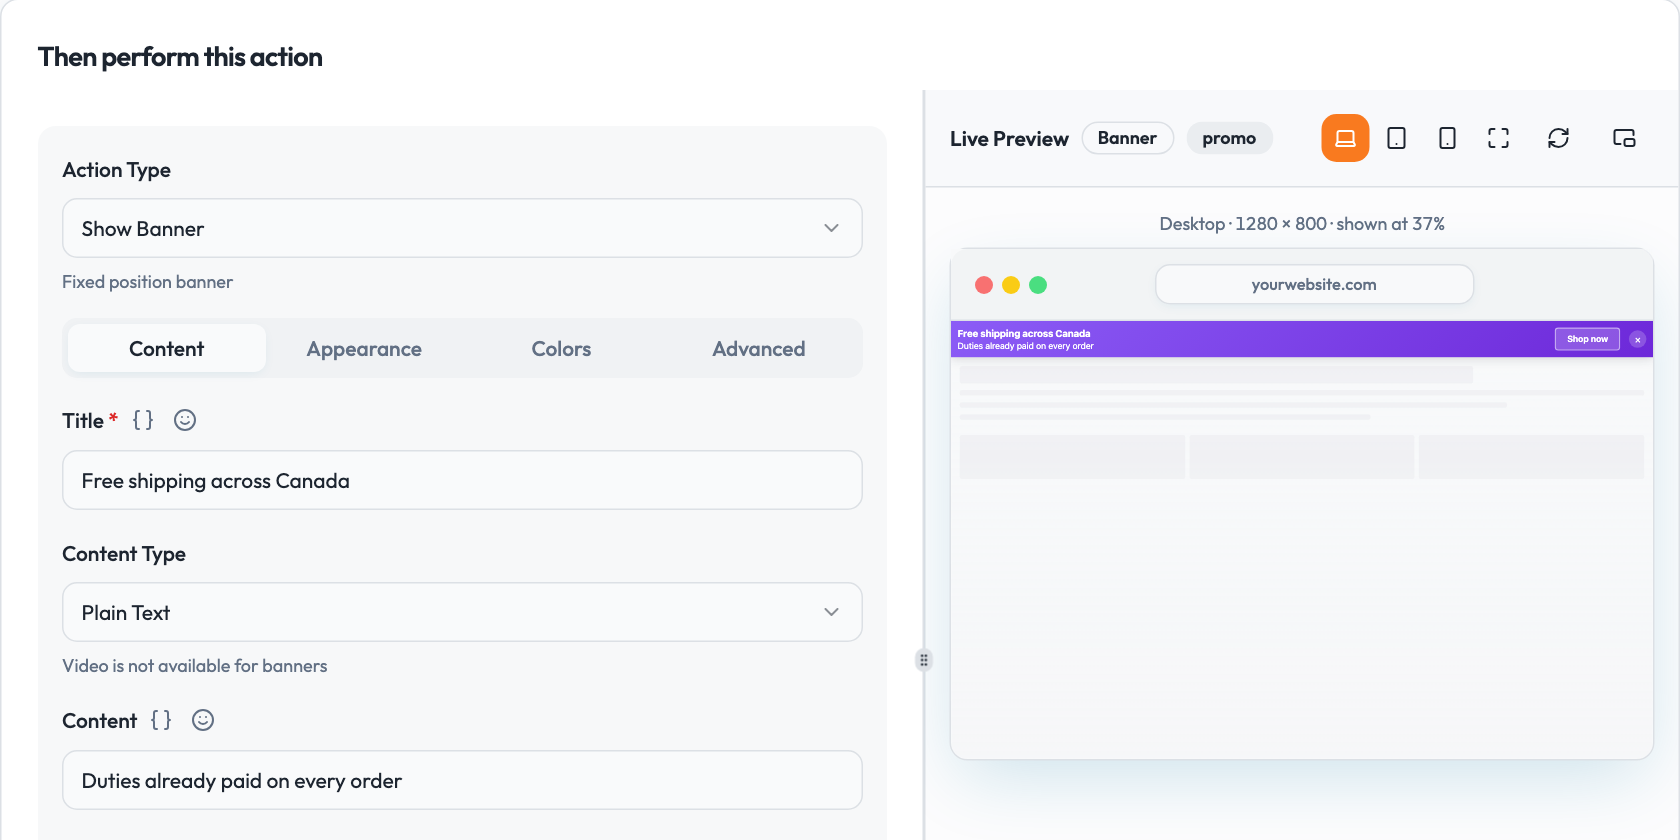
Under Then perform this action, choose Show Banner and write its title: Free shipping across Canada. The live preview beside the settings shows the banner as you type.
Two settings worth choosing while you're there:
- Display frequency. Until Dismissed shows the banner on every page until the visitor closes it, then never again (Timing and frequency).
- The button. Link it to your shipping page, or leave the link empty so the button closes the banner.
Step 4: Publish and check it
Choose Save & Publish. Nothing on your store changes until you do.
To see the banner yourself, you have to look like a visitor from Canada: open your store in a private window, through a VPN set to Canada. To see why a rule did or didn't run, add data-debug="true" to the tag and read the browser console (Debugging).
Try this rule in the GeoEngage rule builder, no account needed.
Or use your theme's own announcement bar
If your theme already has an announcement bar, a second banner on top of it crowds the page. Change the bar you have instead: choose Replace Text as the action, and use Pick an element on your site to click your announcement bar. Visitors from Canada then read the Canadian message in the bar your theme already shows, and everyone else reads the usual one.
One banner per country
Make one rule for each message, and give each its own countries:
| Rule | When visitor matches | Banner |
|---|
| Shipping: Canada | Country Code equals CA | Free shipping across Canada |
| Shipping: UK and Ireland | Country Code is one of GB, IE | Delivered in 3–5 working days |
| Shipping: everywhere else | Country Code is not one of CA, GB, IE | We ship to {{country}}. Delivery costs are shown at checkout |
Every rule that matches runs, so keep the conditions from overlapping: each visitor should match exactly one. A visitor whose country can't be found matches none of them, not even the is not one of rule, and sees your store as usual (Location conditions).
{{country}} is dynamic text: each visitor reads their own country's name.
Check that it helped
A banner is only worth keeping if it changes what visitors do. Turn on A/B Testing in the rule's Advanced Settings, with one version against nothing: some visitors from Canada see the banner, the rest see your store as it was, and GeoEngage compares how many in each group reach your goal (A/B tests).
On Shopify, choose that goal with care. Shopify runs checkout itself and doesn't load your theme there, so a goal on the order confirmation page is never reached. Count a step your theme does show instead, such as an Element click goal on your Add to cart button (Goals and conversions).
GeoEngage waits for at least 100 visits in each group and calls a difference only when it's statistically significant. Let the test run its course: early leads come and go.
Common questions
Can it show different prices for each country?
No. A rule changes what visitors read, not what they pay. Prices for each country are set in Shopify Markets.
Will visitors see the page change as it loads?
Not if the tag is where the install guide puts it: in <head>, without async or defer, so it runs before the page first appears. If you do see a flash, Troubleshooting covers the causes.
Does it work on the checkout pages?
No. Shopify doesn't load theme code in checkout, so rules run on every storefront page except checkout.
Do I need a developer?
Only to paste one tag into your theme, and the Shopify install guide walks through it step by step. Everything after that happens in the rule builder.